Application of four-axis CNC machining technology for shaped parts
Table of Contents
Abstract: By analyzing the overall structure of the shaped parts, the processing difficulties are clarified, reasonable processing procedures are formulated, and the processing process is completed by combining the concept of lean production. Four-axis CNC machining method is used for external shape machining. The CATIA-CAM CNC programming module is used to complete the pre-processing machining trajectory creation, generate the APT file, use machine tool post-processing technology to convert the tool trajectory into the CNC machining program recognized by the machine tool, and then use VERICUT software to simulate the machining program tool path, and finally finish machining on the four-axis CNC machine tool.

Description of the structural characteristics of the shaped part
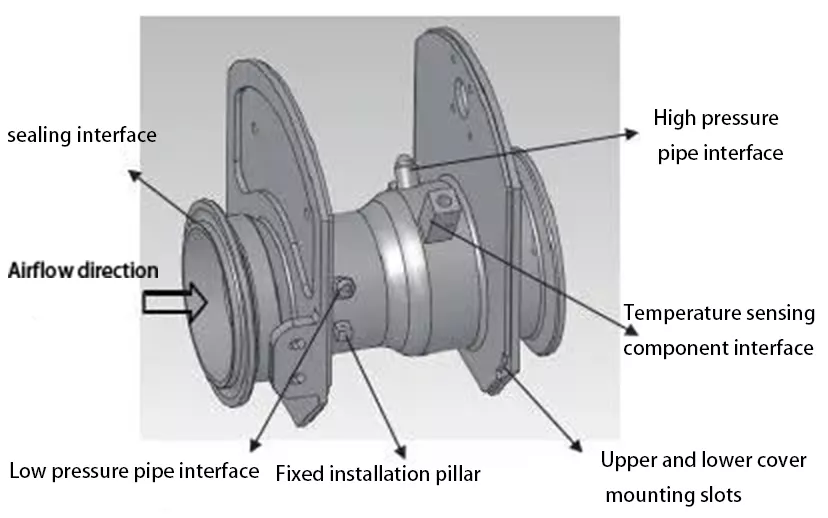
The shaped part is part of the flow temperature sensor; the part contains features such as a curved surface, shaped slot, shaped mount, circumferential distribution of coupling studs and mounting holes, and high and low-pressure interfaces.
① High and low-pressure pipe interface The high and low-pressure pipe interface is distributed on the curved surface of the shaped part. As the airflow enters from the equal-diameter inlet section, it transitions through the aperture contraction to become smaller and the roar stage, the greater the speed of the gas passing through the roar, the smaller the gas flow pressure generated. On the contrary, after the aperture expansion becomes larger, the howler stage transition, the smaller the gas speed through the howler, and the greater the gas flow pressure generated.
②Fixed installation pillar One fixed installation pillar, each in the high-pressure area and low-pressure area, with the same structure size and insurance hole position processing in the center, plays the role of fixed mating parts.
(3) Temperature-sensitive component interface The interface size is connected to the temperature-sensitive component, the inner hole is threaded, the height of the pillar and the depth of the thread are related to the structure of the temperature-sensitive component, and the safety hole is processed at 45° behind the side of the temperature-sensitive component interface. It is used to fix the mating parts.
④ Seal interface The seal interface is divided into the inlet and the outlet end; all are connected with the seal ring. Dimensional processing accuracy is required to ensure that there is no leakage of gas flow at the inlet end and the outlet end. Otherwise, there will be a loss of pressure on the gas flow pressure in the inner cavity, resulting in inaccurate airflow pressure at the output end of the high and low-pressure pipe interface.
⑤ Upper and lower cover mounting Shaped groove parts are evenly distributed U-shaped grooves on the inside of the platform on the front and backside, and the local position is connected with the welding pillar, which is fixed by the welding processing process method. After forming, screws tighten the upper and lower cover parts to close the parts connected with the venturi and other test products.
Four-axis machining shaped parts complex analysis and programming creation.
For shaped parts, shape surface distribution of the pillar interface features, four-axis CNC programming method processing, and CATIA-CAM CNC programming software for pre-processing program preparation.
Four-axis CNC milling process clamping method using arbor positioning, the arbor clamped on the rotary table, driven by the A-axis rotation of the part in the machining and spindle linkage process. The positioning reference of the arbor is referenced to the axis of the center of rotation of the part, and based on the structure of the cavity of the shaped part and the dimensional tolerance requirements, the working surface of the arbor is determined to fit well with the inner wall of the shaped part to maintain the circular runout ≤ 0.01 and coaxially ≤ 0.02. In terms of function, the arbor provides torque through static friction to ensure the stability of the cutting process; the arbor provides radial support to avoid the deformation of the thin wall of the shaped part caused by the cutting force. At the same time, the roughness of the working surface of the arbor should be above Ra0.8, and the surface should be round and smooth to avoid scratching the inner wall of the shaped parts. Secondly, the arbor is easy to install and disassemble, and there is no interference with the tool during the four-axis CNC milling process.
After importing the part model into the CATIA-CAM machining environment, enter the multi-axis CNC machining operation interface. Firstly, set the machine structure, machining coordinate origin, part geometry, blank geometry, and machining safety plane. Secondly, the profile surface milling method for shaped parts mainly applies contour, along-surface, and 4-axis directional milling. The parameter settings mainly include machining, geometric, tool, speed, and advance and retract parameters. The main parameters of 4-axis surface machining are shown in Table 2, and after setting the parameters, a simulated machining path is produced. By simulating the pre-processing tool path, we can analyze whether the part is cut, overcut, or undercut after machining, and generate the pre-processing APT file after the simulation to verify that there is no problem.
4, VERICUT simulation and four-axis machining
Shaped parts in the four-axis CNC machine tool before the actual processing increased simulation technology, the use of VERICUT simulation software simulation of CNC machining process, this process can eliminate errors in the CNC program, such as cutting the workpiece, overcut, undercut, machine collision, tool interference, Etc., can also reduce the actual cutting verification, improve processing efficiency, improve the quality of the workpiece and reduce production costs. With the development of CNC machining technology, the application of CNC simulation technology is a very important simulation of the machining process that can ensure the correctness and rationality of the CNC program.
Referring to the structural characteristics and motion characteristics of the four-axis CNC machine tool, create a machine tool post-processing conversion program, convert the CATIA-CAM CNC program pre-processing tool position file into an NC CNC program that can be executed by the machine tool, and then import the VERICUT simulation software for verification. Open the VERICUT simulation software; you need to set it up in the new project tree environment; a single station custom naming can verify a CNC program. First, set up the CNC machine and CNC machine settings, including machine control system, machine structure and movement, travel limits and collision settings, and other parameters, the system default in VERICUT simulation software can be directly selected from several similar machine control systems.
Machine structure to maintain consistent with the actual processing of four-axis CNC equipment; if the default machine structure of the system in VERICUT software does not meet the requirements, you need to re-create the machine mechanism, set the X-axis, Y-axis, Z-axis, and A-axis rotation, tool axis, table and clamping, the need to process the blank parts, and set the way of a motion to connect the spindle to form a virtual motion machine structure, the need to verify the processing of the blank parts clamped to The blank part to be verified is clamped on the table and fixed. Then set up the machining coordinate system in the project tree; this machining origin should be consistent with the coordinate origin of the CNC programming processing in CATIA-CAM, reference conversion of the NC CNC program for the implementation of the coordinate system offset, right-click in the set-up of the completed machining coordinate system to increase the offset coordinate system settings, where Fanuc and Siemens control systems need to enter the G54 ~ G59 instructions in the register. Then add the tools needed in the CNC program to the tool library in the project tree, ensure the order of tool use is consistent with the CNC program, and adjust the tool compensation settings to the tool point ID number and the same tool sequence number. Finally, the NC program to be verified will be imported into the project tree for verification machining.
VERICUT simulation to verify the NC program into the four-axis CNC machine, clamping the blank parts, setting the machining origin, and tool compensation parameters to machining to verify the NC program. Through the lean manufacturing process for this kind of shaped parts processing verification, to achieve the rationalization of the processing process, CNC program optimization, and tooling fixture generalization. It also accumulates experience for other types of parts processing.
Conclusion
Shaped parts as the core parts of the flow temperature sensor products, the whole process of difficult problems is mainly concentrated in the shape of the surface, shaped groove, shaped mount, circumferential distribution of the coupling studs and mounting holes, high and low-pressure interface features, combined with the structure and motion characteristics of CNC machine tools using four-axis CNC programming technology, the use of CATIA-CAM CNC programming module to complete the creation of four-axis CNC milling program, and then use VERICUT CNC simulation software to complete the verification process, to ensure the accuracy and rationality of the CNC program in the process of the part, and finally through the actual verification of the four-axis CNC machine to complete the machining process.


